Building Physics: Condensation, Dew Point, and Hygrothermal Movement
Genuine building science, written in plain terms. Why moisture shows up where it does, and why it’s not always a hole in your roof.
Last updated: August 2026
Water Doesn’t Always Mean a Hole in Your Roof
When a stain shows up on a ceiling, the instinct is to assume the roof is leaking somewhere directly above it. Sometimes that’s exactly right. But a meaningful share of what looks like a roof leak is actually condensation, moisture that formed inside your house rather than water that got in from outside. Telling the difference matters, because the fix for each one is completely different, and calling a roofer for a condensation problem means paying for an inspection that can’t find anything wrong, because nothing on the roof surface is actually broken.
Four Ways Water Actually Gets In
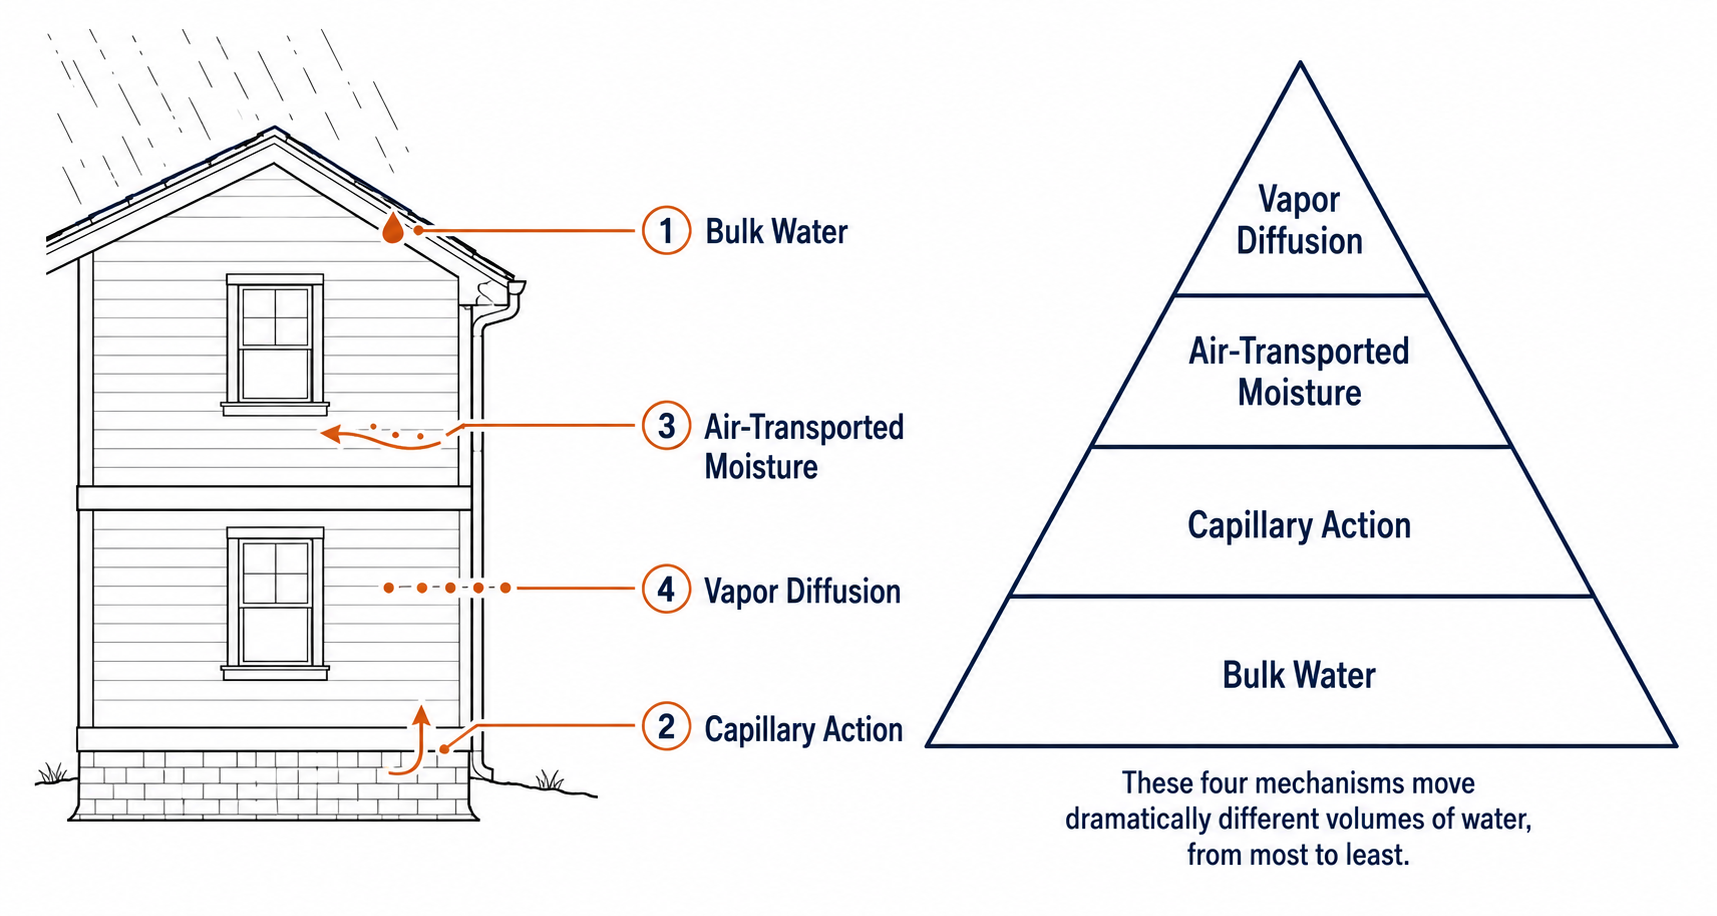
Building science recognizes four separate mechanisms that move water into a structure, and they’re not equally important, they matter roughly in this order. Bulk water is liquid water flowing under gravity, rain and runoff finding a physical gap, and it moves by far the largest volume of the four. Capillary action, sometimes just called seeping or wicking, is water drawn through tiny gaps and porous materials by surface tension, capable of moving water sideways or even upward against gravity through a crack too small to see. Air-transported moisture is water vapor riding along inside moving air, covered in detail below. And vapor diffusion is water vapor passing directly through a solid material, also covered below, and the smallest contributor of the four by a wide margin.
Bulk water and capillary action are mostly a story about physical building details, flashing, valleys, roof edges, exactly the territory covered in The Details That Matter. This article focuses on the other two, air movement and diffusion, since they’re invisible, don’t show up as an obvious hole anywhere, and are consistently the two mechanisms homeowners and even some contractors misdiagnose.
Dew Point, Explained Simply
Air holds moisture, and warm air holds more of it than cold air. Dew point is the temperature at which air can’t hold any more moisture and starts releasing it as liquid water on whatever surface it touches. You’ve seen this on a cold glass of water on a humid day, the moisture beading on the outside of the glass isn’t coming from inside the glass, it’s water vapor in the surrounding air hitting a cold surface and condensing. The exact same physics happens inside your attic, your walls, and your ductwork. Anywhere warm, moist air meets a surface cold enough to be at or below the dew point, water forms, and it keeps forming as long as that condition exists.
Where Attic Condensation Actually Shows Up
The attic is the most common site by far. Warm, moist household air rises and finds its way into the attic through gaps most homeowners never think about, can lights, an unsealed attic hatch, plumbing and electrical penetrations, and bathroom fans or dryer vents that were installed to dump into the attic instead of being ducted all the way outside. That last one is a genuinely common mistake and a frequent cause of what looks exactly like a roof leak, since the moisture collects on the underside of the cold roof deck and drips or stains in a pattern that’s easy to mistake for a material failure.
HVAC systems cause two distinct versions of this, both especially relevant in a hot, humid climate with attic-mounted equipment. The evaporator coil produces real condensate water that has to drain through a condensate line and pan, and when that line clogs, the overflow can soak insulation and drip through a ceiling in a way that looks identical to a roof leak. Separately, ductwork running through an unconditioned attic can sweat on the outside of the duct itself, cold air inside a poorly insulated duct meeting warm, humid attic air on the outside, a completely different mechanism from a clog but a similar-looking wet spot.
Plumbing can cause its own version too, a supply line or drain leak inside a wall or ceiling cavity has nothing to do with the roof at all, but gravity doesn’t care where water originated, and staining can appear well away from the actual source.
Three Simple Rules Behind Almost Everything Moisture Does
Before the rest of this makes sense, it helps to know three plain physical rules, the same three that explain almost everything moisture does inside a house. Heat moves toward cold, always, the same way water runs downhill, warmth in a house is constantly trying to escape toward the colder outdoors, and it takes whatever path you give it. Moisture moves toward dry the same way, from an area with more water vapor toward an area with less, which is why a humid attic will slowly push moisture toward a drier space next to it even with zero airflow involved. And cold air is denser than warm air, so it sinks, and as it sinks it physically shoves warm air up and out of the way, which is a big part of why heat collects at a ceiling and escapes upward through any opening it can find in a roof.
Hygrothermal Movement, in Plain Terms
Hygrothermal movement just means heat and moisture moving together through a building’s structure, and it matters because that movement has a direction, and the direction changes with the seasons. The general rule is simple: vapor drives from the warmer side of an assembly toward the colder side, always. In a heating climate during winter, the inside of your house is the warmer side, so warm, moist air pushes outward toward the cold, dry exterior, that’s called vapor drive. In a hot, humid climate during summer with air conditioning running, the outside becomes the warmer, more humid side, and the drive reverses, pushing inward toward the cool, conditioned interior. Which side is warmer isn’t fixed, it flips with the seasons, and a building’s vapor barrier and insulation strategy has to account for both directions, not just one.
This matters practically because vapor barriers and insulation need to be positioned based on which direction the vapor drive actually runs in your climate and your specific assembly. A vapor barrier installed on the wrong side of a wall or roof assembly can trap moisture inside the structure rather than keeping it out, causing hidden, slow-building moisture damage that has nothing to do with a leak and everything to do with the physics being fought instead of worked with.
Two Very Different Ways Moisture Actually Moves
There are two separate mechanisms that move moisture from one side of a wall or roof to the other, and mixing them up leads to fixing the wrong problem entirely. The first is diffusion, water vapor passing directly through a solid material, molecule by molecule, driven by the difference in vapor pressure on each side. This happens even through materials with no visible holes at all, drywall, wood, most insulation, all of it is at least somewhat vapor-permeable, and diffusion happens slowly, over days and weeks, whether or not any air is actually moving. The second is air movement, actual air physically flowing through a gap, a crack, an unsealed penetration, carrying whatever moisture that air happens to be holding along with it.
This is exactly why air sealing matters more than most homeowners assume, and why it matters more than insulation R-value by itself. You can have excellent insulation and still get serious moisture damage if there are unsealed gaps letting air move freely, since that leaking air is doing almost all the real work of moving moisture somewhere it shouldn’t be. Insulation slows heat transfer. It does essentially nothing to stop air movement, that’s an entirely different job, done by air sealing, not insulation.
Ventilation and Insulation: Why the Physics Matters More Than the Material
Attic ventilation exists to keep the attic’s temperature and humidity close to outdoor conditions, using intake vents low at the soffits and exhaust vents high at the ridge or gables to create continuous airflow. When that balance is off, too little intake, blocked soffits, exhaust vents fighting each other instead of working together, the attic traps heat and moisture instead of venting it, which accelerates shingle aging from the underside and creates exactly the kind of cold-surface condensation risk described above.
Insulation’s job is to keep conditioned, moist household air separated from the ventilated attic space, and it only works if it’s paired with air sealing. Insulation alone slows heat transfer, but it doesn’t stop air, and moist air bypassing through gaps around penetrations is the single most common real-world cause of attic condensation, more common than any material defect. This is why a genuinely good attic assessment looks at air sealing and ventilation balance together, not insulation R-value in isolation, since a thick layer of insulation sitting on top of unsealed penetrations doesn’t solve the actual physics problem.
What Code Actually Requires
Building code sets a specific ventilation ratio, worth knowing the real numbers rather than assuming your attic simply “has vents.” The baseline requirement under the International Residential Code is a net free ventilating area of at least 1 square foot for every 150 square feet of attic floor area, a ratio written as 1:150. Code allows that to be relaxed to a leaner 1:300 ratio, but only as an exception, and only when specific conditions are met: roughly 40 to 50 percent of the ventilation area has to sit in the upper portion of the attic, generally within 3 feet of the ridge, with the remainder at the eaves, creating genuine balanced airflow. In colder climate zones, a vapor retarder on the warm side of the ceiling is also required to qualify for the reduced ratio. In practice, 1:300 rewards a properly balanced intake-and-exhaust system, it isn’t a lesser standard for a system that skipped the balance.
What this means practically: take your attic floor area in square feet and divide by 150, or by 300 if the balanced-system exception applies, and that’s the total net free ventilating area your openings need to provide combined. A 1,500 square foot attic needs at least 10 square feet of net free ventilation area under the standard 1:150 ratio, or 5 square feet under the 1:300 exception. “Net free area” is its own specific term too, it’s not the physical size of a vent opening, it’s the actual open area air can pass through once screens, louvers, and baffles are accounted for, which is why vent products are rated by their net free area, not just their dimensions.
Why Some Roof Shapes Make This Harder
The soffit-to-ridge model above assumes a roof with a clear, continuous ridge running the length of the house and eaves running the full perimeter, the straightforward case a simple gable roof provides. Not every roof shape cooperates with that model equally well.
Hip roofs, covered in Identify Your Roof Type, are the clearest example. Because all four sides slope instead of two, a hip roof has proportionally far less ridge length relative to its total eave perimeter than a gable roof does, sometimes a very short ridge, sometimes none at all on a pyramid-shaped hip. Less ridge means less room for ridge venting, the primary exhaust point the whole balanced system depends on. Getting adequate exhaust on a hip roof often requires supplemental strategies, additional off-ridge vents, or in some cases powered exhaust, rather than relying on ridge venting alone the way a simple gable roof can.
Complex rooflines with multiple valleys, dormers, or intersecting gable sections create a related but different problem, dead air pockets that don’t get real airflow even when the total net free area technically meets code, since airflow follows a path, and a complicated roofline can trap sections of attic space outside that path entirely. Total ventilation area on paper isn’t the same as balanced ventilation in practice, and this is exactly the kind of detail worth asking a contractor about directly on any roof shape more complex than a straightforward gable.
What This Means for You
Water showing up inside your house is a real problem worth investigating, but it’s not automatically a roofing problem. Attic access, HVAC condensate lines, and bathroom and dryer vent termination points are all worth checking before assuming the roof surface itself has failed. For the specific building details, chimneys, skylights, gutters, and edge conditions, that account for most actual roof leaks, see The Details That Matter.