The Details That Matter: Chimneys, Skylights, Gutters, Edge Metal, and Ice Dams
A mental map of where real roof leaks most often originate, and why these details matter more than the roofing material itself.
Last updated: August 2026
Chimneys and Skylights: The Most Common Roof Leak Locations
If you had to bet on where a real roof leak is most likely to originate, chimneys and skylights are the safest bet, and it’s not because the materials themselves are unreliable. It’s because both are large penetrations through an otherwise continuous roof surface, and every penetration depends entirely on the quality of the flashing around it, not the roofing material itself.
Chimneys need step flashing woven into the roofing material course by course, plus counter-flashing set into the masonry above it. Chimney caps and crowns deteriorate over time too, and when they do, water can enter the masonry itself and travel downward, showing up as a stain that looks like a roof leak but is actually a masonry moisture problem with a completely different fix.
Skylights follow the same logic. The unit itself rarely fails, it’s the curb flashing around its perimeter that typically does, especially as sealants age and lose flexibility over years of temperature swings. Both chimneys and skylights deserve a specific visual check during any roof inspection, since a homeowner who only looks at the shingle field and ignores these two areas is missing where a leak is statistically most likely to actually start.
Roof Edges and Walls: Gutters, Drip Edge, and Ice Dams
The roof edge causes a different category of leak, one that shows up at the fascia, the soffit, or the top of an exterior wall rather than in the middle of a ceiling, and it’s worth understanding on its own.
Clogged gutters are the simplest version. When debris blocks a gutter, water has nowhere to go but up and over, and it backs up under the roof edge instead of draining away. That backed-up water gets behind the fascia board and can work its way into the wall cavity below, which is why a leak that seems to be coming from an exterior wall near the roofline is very often a gutter maintenance problem, not a roofing material problem. Keeping gutters clear isn’t cosmetic upkeep, it’s directly protecting the roof edge and the wall assembly behind it.
Drip edge, the metal flashing installed along the eaves and rakes, does a job that’s easy to underestimate. Without it, water reaching the roof’s edge can follow surface tension back underneath the shingle edge instead of dropping cleanly into the gutter, a behavior called capillary action. A missing or poorly installed drip edge is a common, quiet cause of fascia rot and edge leaks that shows up gradually rather than all at once, which is part of why it’s easy to miss during a quick inspection.
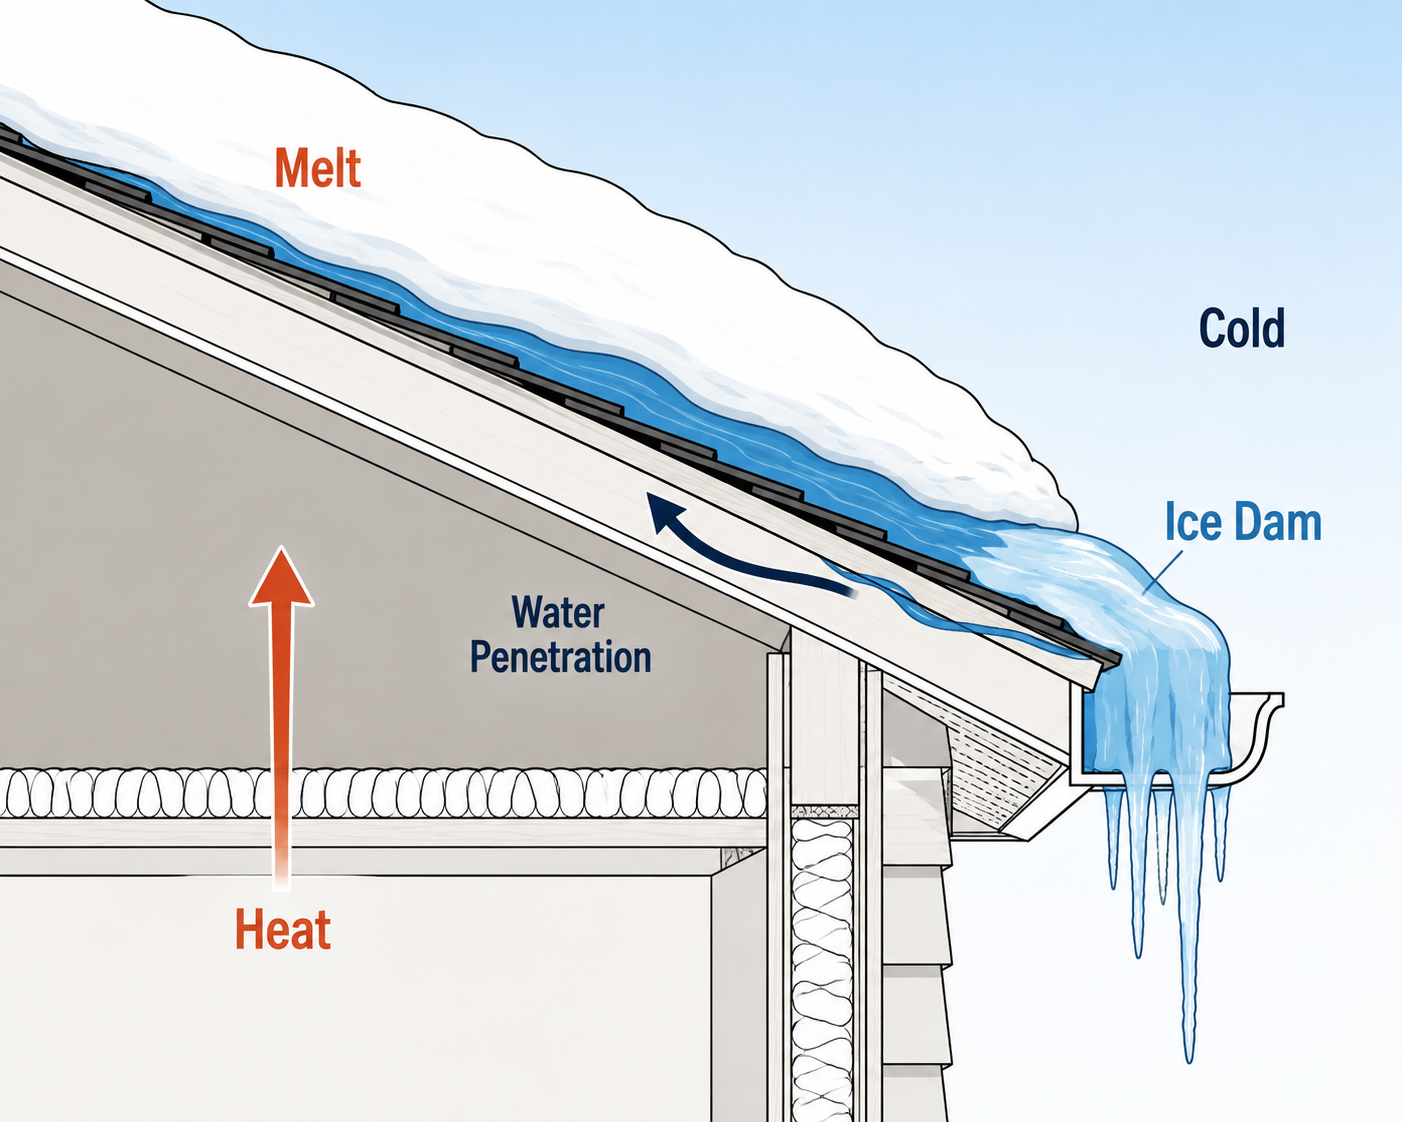
Ice dams are a real concern in colder climates, and the physics are worth understanding since they connect directly back to attic insulation and ventilation, the same principles covered in the companion building physics article. An ice dam forms when heat escaping from the living space melts snow on the upper roof deck, meltwater runs down to the cold, unheated eave overhang, and refreezes there, building an actual dam. Meltwater above it has nowhere to go but backward, up under the shingle laps, well above where drip edge or gutters can do anything to stop it. The real fix isn’t heat cables, it’s the same air sealing and balanced ventilation that prevents attic condensation, a roof deck that stays cold and even from ridge to eave doesn’t form ice dams regardless of how much snow sits on it.
Building code backs this up with a specific, physical requirement in areas with a documented history of ice forming along the eaves. The International Residential Code requires an ice barrier, a self-adhering waterproof membrane installed under the roofing material, extending from the lowest edge of the roof to a point at least 24 inches inside the exterior wall line, measured horizontally. On a sloped roof, that 24-inch horizontal measurement translates to a longer distance up the actual roof slope, and the 2024 IRC update requires even more coverage, 36 inches measured along the slope, on steeper roofs at 8:12 pitch or greater. This isn’t a general national requirement, it applies specifically to colder climate zones, commonly interpreted as areas where the average January temperature sits at or below 25°F, which local building departments determine and enforce, not a simple geographic line. If you’re in a climate where ice damming is a realistic concern, this is a legitimate, specific question to ask a contractor directly: does the estimate include ice barrier membrane at the eaves, and does it meet the current code requirement for your roof’s actual pitch.
Where Else Leak Barrier Belongs: Valleys, Walls, and Dormers
The eave isn’t the only place a self-adhering leak barrier matters, and it isn’t only about ice dams either. Anywhere two roof planes meet, or a roof plane meets a vertical wall, concentrates water flow the same way an eave does, and deserves the same protection, a real membrane, not just standard felt underlayment.
Valleys, where two roof planes meet at an angle, carry more water than any other part of a roof, since they collect runoff from both adjacent slopes at once. The National Roofing Contractors Association recommends leak barrier at least 36 inches wide in every valley, 18 inches on each side of the centerline, essentially universal practice regardless of climate, since a valley concentrates water whether or not ice dams are ever a factor where you live. Building code specifically mandates it on roofs pitched below 4:12, but most manufacturers require it in every valley on every pitch to keep the material warranty valid.
Roof-to-wall intersections, sometimes called sidewalls or headwalls, are the seam where a roof plane runs into a vertical wall, common wherever a single-story addition meets a taller part of the house, or along a chimney’s upslope side. Water running down that wall above the roofline collects right at this seam, and it needs the same self-adhering protection a valley does.
Dormers deserve their own mention, since they concentrate both problems at once. A dormer is a small structure with its own miniature roof projecting from the main roof, which creates a sidewall intersection on three sides and often a small valley where its roof meets the main roof, all packed into a tight, complicated space. This is one of the most leak-prone details on any roof, precisely because of how many vulnerable transitions sit in just a few square feet.
Penetrations like plumbing vents get their own dedicated collar of leak barrier too, typically extending at least 12 inches beyond the penetration on every side, so the deck stays sealed even if the flashing or boot around the pipe eventually fails.
What This Means for You
Water showing up inside your house is a real problem worth investigating, but it’s not automatically a roofing problem. Gutter condition, drip edge integrity, and the flashing around any chimney or skylight are all worth checking before assuming the roof surface itself has failed, and it’s worth asking directly whether valleys, roof-to-wall intersections, and any dormers actually got self-adhering leak barrier rather than standard underlayment, since that’s not always visible once the roofing material is on. If the leak seems to trace back to condensation rather than a physical entry point, see Building Physics: Condensation, Dew Point, and Hygrothermal Movement for the underlying mechanics.